Noobies VÜ

random mutterings and musings by me, myself, and I.

8/17/2014

Guitar Paint Fail

Posted by vanashke001

It's been ages since I've last posted on here. Actually I think most of my blog posts start out with: it's been ages, it's been a long time, etc.
My amazing brother passed away a little over 4 months ago and though I'm not quite ready to write about that at this time, (as Legolas says in LOTR, "...for me the pain is all too near.") he is the cause of this post.
After he passed and I spent time in GA for the funeral his gorgeous wife Robin was so kind as to offer me the choice of a couple of his guitars. After conversing with his son Cameren, I chose a beautiful Lake Placid Blue Fender HSS Stratocaster and a kit Les Paul he had been fiddling with. He had the LP body prepped for paint and all the parts but he hadn't painted it or assembled it.
Robin showed me a video online of how he had wanted to paint it. It was a nifty technique called "dipping" where you actually float the paint on the surface of the water and swirl it together. Man, it looks really easy on the video. But there are things they don't tell you which I will share later. Anyhoo, so I knew the technique and I also had the paints (red, white, and blue) that he had picked up for just this project.


This video makes it all seem so easy but there are some things they don't go into, ambient temperature outside, that the guitar is actually quite buoyant, and the paint will skim up very quickly; I assume this is more a result of the outside temp than anything else.
I tried to do it earlier in the morning before it heated up much, but I think it was still a bit warm.
A few things conspired to make this a fail in the making.
I had to get some Borax and it turns out it had likely been on the shelf for ages at is was completely solid in the box, it was like a 4 pound powdery brick. So I had to break it up a bit, no biggie.
I did the shaky thing with the paints Chris bought, but I clearly should have opened them all up and really looked at them. I didn't realize until I started mixing that the paints were very old and had partially solidified. The red and blue seemed fine but the white was useless. :(
I of course didn't realize that until after I put in the red and blue. This is when I also learned that the paint was skimming and drying on the surface. I had read of this issue with Testors paints but these were Humbrols which all the forums said were best for this and didn't skim up as much. Again, I blame the temperature.
I still gave it a shot though, perhaps in retrospect I shouldn't have. :( as soon as I saw the paint starting to dry on the surface I should have passed it. But I didn't. I gave it a shot anyway.
This is when I learned how the guitar is very buoyant, you actually have to force it down. In watching the above video I never thought for a moment that they were putting effort into it.
So after I got it dunked and cleared the surface I pulled it out and I think this is where the biggest problem with swirl dipping lies, the paint is not even. The paint will pool and congeal in areas and it makes for an uneven and tragic coat.
So I tried, it looks wretched and I will have a job ahead of me re-sanding and priming the body for paint. I don't feel terrible about it, it is a kit guitar and I know it had been sitting for awhile. I also like to think Chris would have been as gung-ho to try. lol He likely would have been much more successful but...
So here are the before and after (for now) photos of my debacle. lol

At best it looks like Jackson Pollock's drop cloth, at worst it looks like a damn blood clot. 
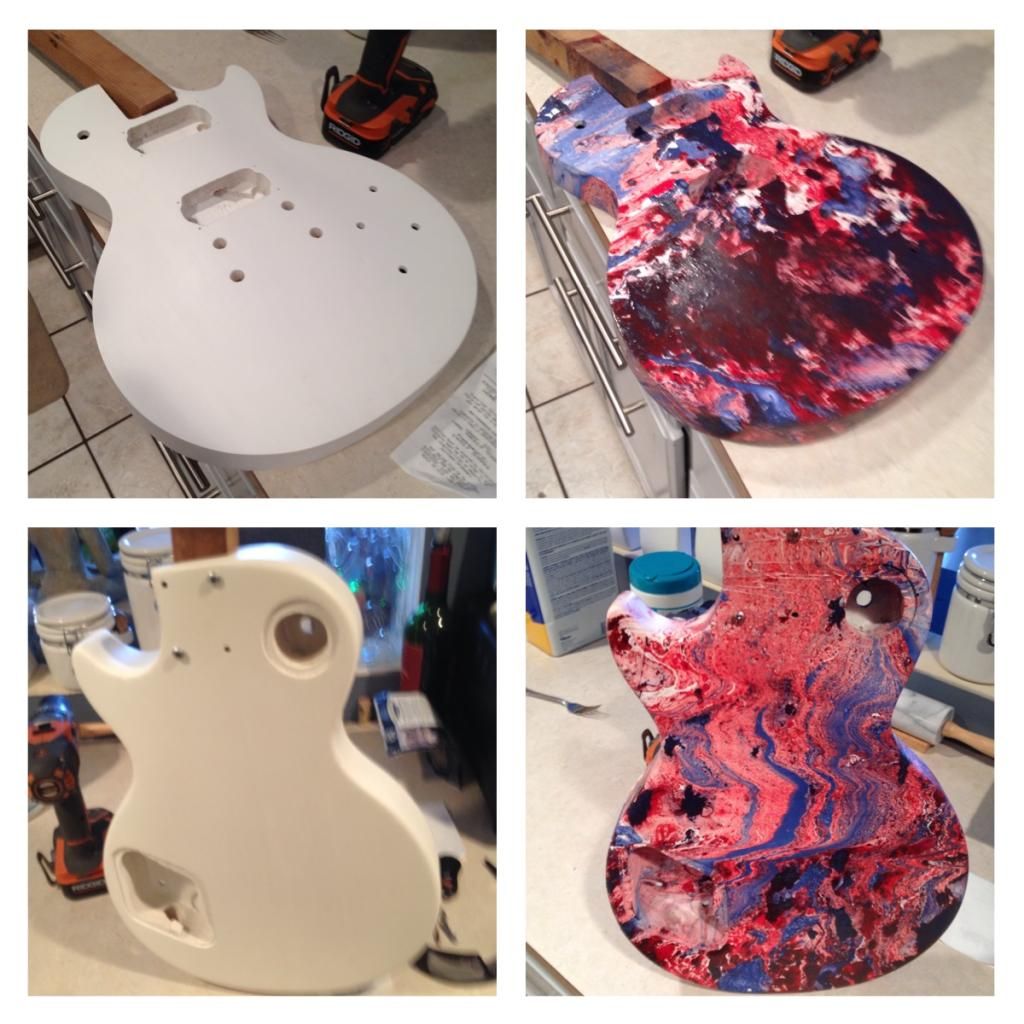
Just hoping to find someone that can actually paint it for me. I'm personally not a huge red, white, and blue fan but I might see if I can come up with a graphic that can be done on it and get someone to execute it. 
I have ideas in mind, but they are mostly black and blue with some ghost flames or graphics of some sort. I'd like to integrate my tattoo that's for Dad and Chris into it (hell, I need to get that done first. lol).
So anyhoo, I made the effort, and if nothing else comes of it at least I made a new blog post. :) Chris was often on my ass about not posting lately. 

2/17/2014

Kitchen 2.0!

Posted by vanashke001

Hootie Hoo!
Got down to work again the last couple of weeks and redid my kitchen. I would love to eventually change the layout but until I have the moola for that I just have to update it when I can.
When I moved in the cabinets were tragic, you can check out my earlier posts about it here.
I have liked the black cabinets for a while now but I noticed that they show every little bit of dust as well as cat hair on the lower cabinets. I have no problem cleaning up after them but they never really seemed to come fully clean.
I also decided that they darkened the kitchen quite a bit and the appliances just faded into the background. I found a kitchen on Houzz that had grey cabinets and since that's a major color in my house I decided it might work out in the kitchen as well. 
I didn't want to go the same route that I did in the rest of the house however as I was hoping to avoid having everything blend together. Plus, with grey cabinets I didn't want them to blend into the background as well. I found a really nice blue from Behr that was just gorgeous and complimented the french silver I decided on for the cabinets. At first I was concerned that they would be too light as they weren't quite the grey I had originally planned on. I also thought at first that they looked a little baby blue-ish but they did turn out a very light grey so I'm happy. 
I also had to add some lighting as there was no light above the sink and I decided under cabinet lighting would be good as well. I am so excited about how it all turned out, throw in the Fasade backsplash and I am truly a happy camper. 
Before 
This is the black I had prior, also note the walls that hadn't been fully painted to the left and above the stove. It's true, we lived with that for at least a year. (as always, click on the pics to embiggen)

 I still think the black looked good, very modern but still. Another angle. I also never finished painting the roll up door on the appliance garage.
And the last one, before.
During the process:
The ones on the floor are new. The 3 door cupboard is for the laundry room.
After painting, loving the blue and grey. Eagle eyed viewers will notice the new cabinet. Thou shalt ignore the messy pantry.
Another angle:
Looks much fresher, cleaner, and also brighter. The black cable is for under cabinet lights that I added.
Yay, let there be light!
And now for the full after, I added some Fasade panels for a fun and interesting backsplash.
If you look closely you'll also see an added spotlight above the sink along with a stainless steel panel I am using to cover the wiring for the under cabinet lights.
I moved the right hand cabinet to the left to align it with the window. This opened up a space between it and the corner cabinet. I decided to add a wine rack/display shelf. Thou shalt ignore the garage.
And now with just the accent lighting. It's funny that I used to think that the light above the oven was bright, now even with the under cabinet lights at their dimmest the oven's are still dimmer. There is no garage.
I even got my knives and magnetic knife rack installed!
I still have some plans for the future but it will be a while. I'd like to do a faux poured concrete counter top. I found a really groovy how-to on Pinterest that I am dying to do. It'll take 3 days though and I would have to remove the sink to do it. I'd love to one day align the sink with the window, right now it's almost a foot off center and it's annoying, but I would have to redo the whole floor plan.
I was being really stingy with the paints I used. I didn't want have a bunch to waste so I just bought pints. I'll tell you, it was a close thing. I could have saved myself a little bit had I not painted before I put up the backsplash but since I wasn't sure when I would be able to get them I thought it would be good just in case. Then I decided to paint the wall beside the fridge, I just barely had enough and when I say barely, I mean scraping the sides of the can like a jar of peanut butter.
This is what I had left:

6/09/2013

Cheap Bastards

Posted by vanashke001

Once again I take up my hammer to try and make some improvements to my house. This one is gonna take a little time though, couple weekends worth.
My house is an odd house dear readers, it's kind of a stupid house, it's also unique and I do like it, but damn, every time I try to improve it I run into the idiocy of the former owners.
It gets wretched hot upstairs and I have a real difficult time dealing with it. It's one of those things that I find myself surprised that the people who lived here previously tolerated it. 
I was dubious that there was any insulation on the rear wall and the outside sheathing is looking really bad so I decided to put up some vinyl siding. After an annoying experience with an asshat for customer service at Lowe's (apparently I shouldn't shop for things on Sundays- duh.) I wound up at Home Depot and I found some really inexpensive siding.
Just a little aside, Lowe's has a ton of siding on their website, but they tell you there are 4 profiles and 12 colors, I challenge someone to locate them. Home Depot on the other hand doesn't have anything on their site except for fixture mounts. WTF? This was the reason for my trip to Lowe's but look out! Lowe's doesn't carry siding in their stores, you have to special order (just don't try to look for samples on a Sunday). But Home Depot actually carries siding.
Back to the siding I found at HD. They had a single box of 4.5" double lap for $46! They only carry 5" double lap now I guess. I can also tell you a single box will help no one. Except me! I only have to cover the upper bit above the back roof and it's 32' x 32" and this is more than enough for that. Just FYI, a box of siding is normally $158.
Here's the tragic back of my house, don't judge me I have a budget. lol


I pulled off the old sheathing to take a look at what was under it; I figured if I was going to side it I should go the extra mile and address the insulation as well.
This is what I found...

Just so you know, that is my AC ducting. The silver bit is about the size of a stock pot. So, most of my heating and cooling has been going into the void. Sigh.

Here's another shot in from a different area. They really did just redneck everything in this house. sigh


Last night and early this morning I put in more insulation (The big wads shoved inside the voids really don't offer much I don't think) and secured the sheathing a bit more effectively. Next weekend I install the siding! Hopefully.

6/09/2013

Master Bedroom Pt. 1

Posted by vanashke001

All the projects I've done have been in other parts of the house but I finally decided I should do something in my master. Admittedly it's not like anyone else goes in there, but hey, I sleep there!
I've collected quite a few Egyptian objet d'art; papyrus, tiles, etc but no real place to put them. Then I decided I had a whole wall in my bedroom that I could put them on. 
The only real issue I had was figuring out how best to arrange them. I'm still not thrilled with the end result, but it's a start. Next up, new headboard, book cases and perhaps a spot of paint.
Forgive the wires and stuff from the TV, I just installed it and the shelf so I hadn't really cleaned up.

I'll probably wind up rearranging them eventually. I'm not sure I love them all blown on one wall, but for now...

6/09/2013

TV Stand cum Buffet

Posted by vanashke001

Since I have moved my TV upstairs I had this fabulous TV stand that I got just gathering dust in the living room looking sad with no real purpose. It was too low to really display much on it and I decided I might have a better use for it.
I've needed more storage for some things from the kitchen and I didn't have any place to store my "fancy" plates. It was still a bit short for that purpose but then I remembered some hardware I had from my old bookcase that I made a few years back but had to sadly dismantle. So I grabbed the stainless uprights and my drill and some more lumber and paint from Home Depot and made a stand to put the TV stand on.
It's not ideal, but it's functional and I don't have a wasted piece of furniture. :)


It holds my pier one dishes, crock pot and the huge pot my beloved brother got me for making gumbo! I plan on getting some baskets and cook books to put below. Storage is always good!